


|
|
|
|
| 1/60 sec | 1/125 sec | 1/250 sec |
|---|
At 1/60, you can see severe motion blur in the dancers at the left who are bowing and slight blur in the dancer who is standing still but raising her arms (click through to see a larger version). At 1/125 there is blur in the hands, right leg and face of the running dancer (but not in the planted left foot). At 1/250 there is blur in the dancer who has just landed a jump. You can see it in the closeup crops below: the face has motion blur (because the whole body is still moving downwards) but the right foot is very sharp (because its motion has been stopped by the floor):

|

|
| Crop of 1/250 sec (motion blur) | Crop of 1/250 sec (sharp) |
|---|
Now let's see some photos where motion blur is not a problem:

| 
| 
|
| Motionless pose at 1/125 | Crop of Motionless at 1/125 | Fast Motion at 1/400 |
|---|

| 
| 
|
| Jump at 1/500 | Crop of Jump at 1/500 | Another Crop of Jump at 1/500 |
|---|
What can you can do to minimize subject motion blur?

| 
| 
|
| Jump at 1/125 | Crop (top of jump; sharp) | Crop (bottom of jump; blur) |
|---|

| 
| 
|
| Pan at 1/40 | Crop of pan at 1/40 | Crop of pan at 1/40 |
|---|

| 
| 
|
| 1/160 sec | Crop of 1/160 | Crop of 1/160 |
|---|---|---|

| 
| 
|
| 1/320 sec (photo by Arsky) | Crop of 1/320 | Crop of 1/320 |
|
Hand-held: tucked in |
Monopod |

Tripod |
As a rough rule, you can expect to hand-hold a lens without noticeable shake at a shutter speed at least as fast as the reciprocal of the focal length. For example, with a 200mm lens, this rule says you should be shooting at 1/200 sec or faster. Assuming you have a half-frame sensor and/or you expect to crop the image, this will make the image relatively larger, thus multiplying the effects of shake. To be safe then, the rough rule would be to double that figure to 1/400 sec. On the other hand, image stabilization in the lens coupled with good technique (as outlined above) can allow you to shoot three or four stops slower (1/50 to 1/25 sec.). In the end, for dance photography, if you have image-stabilization and good technique you are more likely to suffer from motion blur than from camera shake.
If the subject does stay still, with good hand-held technique you can shoot at very slow shutter speeds (click through to see the detail):

| 
| 
|
| 1/15 sec at 200mm | 1/10 sec at 200mm | 1/4 sec at 135mm |
|---|
Focus is an artistic decision; it is usually bad to have the main subject out of focus, but it can also be bad to have too much distracting background in focus.
The first thing you have to be aware of is the width of the focal plane--how much of your picture will be in focus. This is called the depth of field, and it depends on four things: the distance to your subject, your aperture setting, the focal length of the lens, and your degree of fussiness or scrutiny. The chart below left shows some sample depths of field for different combinations of distance, aperture, and focal length (with average scrutiny). On the right is a table of the three factors, and a diagram where the focal plane is centered on the middle butterfly, and everything within the depth of field is in focus, while the near and far butterflies are outside the depth of field and are out of focus.
|

|
For example, if you have a 200mm lens set at f/2.8 and you sit 20 feet from the front of the stage, then your depth of field is just 4 inches for a dancer all the way downstage, and 1 foot 3 inches for a dancer 40 feet away upstage.
What does this all mean? It means you have to be careful with the 200mm portraits, but needn't worry much about the 50mm shots. By careful, I mean taking care with where you place the focus selector point (the little dot or rectangle in the viewfinder--on most cameras it lights up red). Suppose you want a portrait of a downstage dancer who is in a pose with her head leaning backwards. If the focus point is somewhere on her torso, then her face will not be in sharp focus. What can you do? You could change your aperture to f/5.6 (or maybe even f/8), giving you more depth of field. Or you could zoom out to 100mm, in which case the depth of field is about 2 feet 7 inches and you'll be fine although you get a wide shot, not a portrait. (I should note at this point that a wide angle lens only gives you more depth of field if you consider the whole shot. If you crop the 24mm shot so that a dancer occupies the same portion of the frame compared to a 200mm shot, then the 24mm and 200mm will have the same depth of field. See, for example, Michael Reichmann's explanation of this.)
But the best solution is to place the focus point exactly where you want it. Your camera has a controller (dial/buttons/joystick) that allows you to select one of several focus points. The image below replicates the view through the viewfinder. I used the joystick to select the top focus point (the red rectangle) and placed it over the dancer's eye while half-pressing the shutter. I waited for a pause in her motion (because this scene is rather dark and I only had a shutter speed of 1/125 sec) and then fully-pressed the shutter to capture this shot.

|
| Focus point on eye (f/2.8, 1/125, ISO 1600, 200mm, distance about 20 feet) |
|---|
You can see that the depth of field is shallow: the dancers in the background are very blurred, and even the main subject's fingernails, which are only about a foot in front of the focal plane, are somewhat blurred. If I had left the focus point on the default center position (which you can see is on the side of the neck), I would not have gotten the face in sharp focus.
Here are some reasons why the autofocus system can miss, and things you can do to minimize the problems:
Consider the "Focus point on eye" image above. It was taken at f/2.8, 1/125 sec, ISO 1600 and is well-exposed. As we will see in the next section, If we took it at f/11, 1/500 sec we would have to use ISO 102,400. Some cameras go that high, but the results will be extremely noisy. So we have a never-ending trade-off between noise, motion blur, and depth of field. Sometimes there is plenty of light and you have nothing to worry about; sometimes a scene is so dark that you must decide which factor to compromise on.
Why are ISO 102,400 pictures noisy? And what is ISO, anyways? ISO is the Internatinal Organization for Standardization, and in 1979 they set up a scale to standardize film speeds; that scale has been transfered over to digital. You can think of ISO 100 as the base rate, and every doubling of the ISO number (to ISO 200, ISO 400, ISO 800, etc.) as telling the camera to count each photon of light twice. So in a perfect world, a photo of a still subject at 1/500 sec at ISO 400 would look the same as a photo at 1/125 sec at ISO 100 (the former is 1/4 the exposure time and counts each photon 4 times). But we don't live in a perfect world; we live in a random quantum world in which there is always fluctuation in the amount of light gathered. At ISO 102,400 each little fluctuation is magnified by a factor of 1024, making them very visible.
Here are some real-world examples with an older camera (the Canon 5D II from 2009). The pictures look pretty good even with the crops, but if you click through to the even-larger versions, you can see noise in the ISO 3200 and 5000 shots.

| 
| 
|
| ISO 1600 | ISO 3200 | ISO 5000 |
|---|---|---|

| 
| 
|
| Crop of ISO 1600 | Crop of ISO 3200 | Crop of ISO 5000 |
The web site DxOMark tests cameras and reports the highest ISO speed at which cameras continue to deliver excellent picture quality. Here are a few of their ratings, to which I've added the sensor area and approximate price:
| Highest Excellent ISO | Camera | Sensor Area | Price |
|---|---|---|---|
| 2900 | Nikon D600 | full-frame | $700 |
| 1400 | Sony a6300 | 1/2 frame | $900 |
| 1200 | Canon 80D | 1/2 frame | $900 |
| 900 | Olympus E-M10 | 1/4 frame | $650 |
You can see that, in general, the larger the sensor area, the better the performance. You probably can't notice the noise difference between the two 1/2-frame models, but you will easily notice that the full-frame D600 has less noise. Judgments are subjective, and DxOMark is run by camera snobs (and I mean that in a good way) so you will probably find that you're getting very good images at a stop higher ISO than their rating. In part it depends on whether you want to print small 4x6" prints versus big 20x30" posters. If you can tolerate the noise in ISO 6400 pictures, great for you! That means you can use the slow f/5.6 zoom lens that came with your camera rather than having to upgrade to a more expensive f/2.8 lens.
Different cameras have very different controls for handling ISO settings, so depending on your particular brand of camera you might prefer either of these two approaches:
Auto ISO: allow your camera to choose the right ISO setting (after you have chosen the other settings: exposure compensation and aperature size or shutter speed). Many newer cameras do auto-ISO well, but some cameras make poor choices. One thing you should certainly do is set the maximum ISO value that can be auto-selected. This can be done with a one-time menu setting.
Manual ISO: start by setting your ISO to a value that will
yield good shutter speeds in most situations, but without too much
noise. (Probably somewhere around ISO 1600, but it varies by camera.)
Then in a brightly-lit scene you can switch to a lower ISO value; in a
dark scene you can switch to a higher value. You may have to do a
one-time change in the menu settings to make sure that ISO is
accessible with a single button press rather than multiple buttons.
9: Exposure
Exposure
refers to the amount of light gathered for an image. A camera has
three controls that you must deal with:
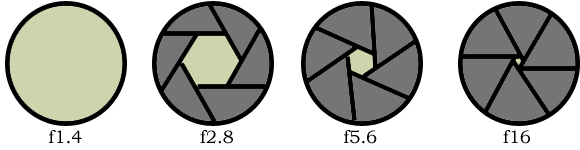
(Jargon note: the word stop originally meant a physical object, such as the shutter blades we see above that stop light from entering the camera; now "stop" refers to the abstract concept of doubling (or halving) of light-gathering ability, in either aperture, shutter speed, or sensitivity. Two things are confusing about the f-stop numbers. First, f/1.4 seems like a small number but it is a big hole, while f/16 seems like a big number and is a small hole. That's because the "/" in "f/16" is a division sign; the larger the denominator of a fraction, the bigger the number it represents. Second, we don't just have whole numbers in a doubling pattern like 2, 4, 8; we also have intermediate numbers like 2.8 and 5.6. That's because the f-stop numbers refer to the diameter of the circle, but the amount of light is determined by the area, which is proportional to the square of the diameter. So a doubling of diameter (say from f/4 to f/2) is two stops (quadrupling the area), while a doubling of area (a single stop), would change the f-stop number not by a factor of 2 but by the square root of 2, which is about 1.4.
The lens that came with your camera is probably something like an 18-55mm zoom with a maximum aperture of f/3.5-f/5.6. This means a maximum of f/3.5 at the 18mm (wide) end and f/5.6 at the 55mm (telephoto) end. Lens also have a minimum aperture (usually in the f/16 to f/32 range) which is relevant for landscape and macro photography, but not for action.
The camera simulator made available by camerasim.com, lets you see the effects of varying aperture, shutter speed, and ISO sensitivity. Can you get a "smily face" picture with "bright indoors" lighting? You need to get just the right balance to avoid a "grainy" or "blurred" image. With "dim indoors" lighting, there is no way to get a "smily face" picture with the available settings (you could do it with a f/1.4 lens rather than a f/2.8 lens, or with a camera that can handle ISO 1600 without getting grainy.)
We'll first consider a dimly-lit scene at EV 6. If we cut the shutter speed in half 6 times we go from 1 second to 1/2, 1/4, 1/8, 1/16, 1/32, and finally 1/64, which we round off to 1/60. So EV 6 is f/1, ISO 100, 1/60 sec
Of course, most of us do not have an f/1 lens, and we know that 1/60 sec would likely give us severe motion blur. The principle of reciprocity says that if we simultaneously double the ISO and half the exposure time we end up with the same exposure value. Same thing if we half the aperture area (which corresponds to multiplying the f number by 1.4) and double the ISO. (Note: in the song Popsicle Toes (which happens to involve a Pentax photographer), Michael Franks writes "When God gave out rhythm / He sure was good to you / You can add, subtract, multiply / and divide by two." And in fact, multiplying and dividing by two is all a photographer needs to do.)
According to the principle of reciprocity, EV 6 is equivalent to any of the following (I have added annotations for the amount of blur for a moving subject and the amount of noise):
| Aperture | Shutter speed | Sensitivty | EV | Reason | Blur | Noise |
|---|---|---|---|---|---|---|
| f/1 | 1/60 sec | ISO 100 | 6 | +6 stops in time from EV 0 | severe | none |
| f/2.8 | 1/60 sec | ISO 800 | 6 | -3 f-stops, +3 stops ISO from previous line | severe | slight |
| f/2.8 | 1/125 sec | ISO 1600 | 6 | -1 stop time, +1 stop ISO from previous line | noticeable | slightly more |
| f/2.8 | 1/250 sec | ISO 3200 | 6 | -1 stop time, +1 stop ISO from previous line | slight | more |
EV 6 is risky territory: assuming you have a camera that performs well only up to about ISO 800, then no matter what choice you make in the reciprocity trade-off you risk either motion blur or a noisy photo, or both. And that's with a f/2.8 lens! If you only have the f/5.6 lens that came with your camera, your choices are dismal at EV 6:
| Aperture | Shutter speed | Sensitivty | EV | Reason | Blur | Noise |
|---|---|---|---|---|---|---|
| f/5.6 | 1/60 sec | ISO 3200 | 6 | -2 f-stops, +2 stops time from previous line | severe | more |
| f/5.6 | 1/125 sec | ISO 6400 | 6 | -1 stop time, +1 stops ISO from previous line | noticeable | severe |
| f/5.6 | 1/250 sec | ISO 12800 | 6 | -1 stop time, +1 stops ISO from previous line | slight | extreme |
But you can turn that around by investing $100 in a 50mm f/1.8 lens (or $400 in a 85mm or 100mm lens) shooting at f/2:
| Aperture | Shutter speed | Sensitivty | EV | Reason | Blur | Noise |
|---|---|---|---|---|---|---|
| f/2 | 1/250 sec | ISO 1600 | 6 | +3 f-stops, -3 stops ISO from previous line | slight | slightly more |
| f/2 | 1/125 sec | ISO 800 | 6 | +1 stop time, -1 stop ISO from previous line | noticeable | slight |
(You could also invest $2000 in a full-frame camera that does a stop or two better in low-light noise, among other benefits.)
Now let's look on the bright side: in scenes that are lit at EV 8 you're in good shape with any lens:
| Aperture | Shutter speed | Sensitivty | EV | Reason | Blur | Noise |
|---|---|---|---|---|---|---|
| f/1 | 1/250 sec | ISO 100 | 8 | +8 stops in time from EV 0 | slight | none |
| f/2.8 | 1/250 sec | ISO 400 | 8 | -2 f-stops, +2 stops ISO from previous line | slight | almost none |
| f/2.8 | 1/500 sec | ISO 800 | 8 | -1 stop speed, +1 stops ISO from previous line | almost none | slight |
| f/2.8 | 1/1000 sec | ISO 1600 | 8 | -1 stop time, +1 stops ISO from previous line | none | slightly more |
| f/5.6 | 1/250 sec | ISO 1600 | 8 | -2 f-stops, +2 stops time from previous line | slight | slightly more |
| f/2 | 1/1000 sec | ISO 800 | 8 | +1 f-stop, +1 stop ISO from 2 lines above | none | slight |
| f/2 | 1/500 sec | ISO 400 | 8 | +1 f-stop, +1 stop ISO from previous line | almost none | almost none |
So much for the theory of exposure. But what do you do in practice? You have four things to worry about:
Metering and intent: Your camera has a built-in automatic exposure meter, which usually does a pretty good job of deciding the exposure value of a scene. Let it. Although some people succsfully use manual exposure for dance, I find that for the performances I shoot the lighting changes too rapidly and too much from scene to scene and from one point on the stage to another. However, there are a few metering situations that the camera consistently gets wrong, and you will have to step in and make a correction by twisting a dial.
A common problem in dance photography is when there is an area of the image that you would like to be dark black. The default metering scheme of the camera tries to pull detail out of every image; if there is a large black area the camera will try to make it gray rather than black. If you truly want it to remain black, you need to tell the camera that. The way you do it is exposure compensation, which often is set up on a dial operated by your right thumb on the back of the camera. To keep a dark area black, dial in negative exposure compensation: tell the camera you want the picture to be darker than the camera guessed, by moving the dial. In the two images below, I used an exposure compensation of -2 stops.

| 
|
| f/2.8, 1/160, ISO 1600 (EV 6), EC -2 | f/2.8, 1/125, ISO 640 (EV 7), EC -2 |
|---|
Another problem is when a white (or other light-colored) outfit is large in the frame. The camera can't tell if the outfit is supposed to be gray or white; it guesses gray and exposes accordingly. You fix that mistake by dialing in positive exposure compensation. In the photos below this was +1 stop.
 |  |
| f/2.8, 1/400, ISO 1250 (EV 8), EC +1 | f/2.8, 1/250, ISO 800 (EV 8), EC +1 |
|---|
Postprocessing: One school of thought is to get your exposure just right in the camera. Then you don't have to spend time messing around with your photo editing program ("Damn it Jim, I'm a photographer, not a photoshopper!"). You will probably set up your camera to store jpeg images. These have the advantage of smaller file sizes, making them easier to store and share, and also making it possible to take a longer burst of continuous images before your camera grinds to a halt.
The other school is that you should capture as much digital information as possible in the camera, and then manipulate the image to make it look the way you want. If you subscribe to this school you will probably set up your camera to store RAW images, which take up more space, but capture more digital information.
If you are willing to do the minimal postproccessing of croping, then you can use the strategy:
Shoot wide, then crop: instead of trying to get the framing perfect, zoom out a little, with the expectation that you will crop the image in your editing program. This makes action photography easier; if you are shooting wider you don't have to worry as much about a hand getting cut by the side of the frame, you just leave plenty of space and remove the excess space with a crop in your editing program.

| 
| 
|
| 173mm: too long; cropped hand | 125mm: better; can crop in editing program | 125mm, cropped |
|---|
Exposure compensation: You will still need to adjust exposure compensation, depending on the scene. For example, suppose I am shooting the white dress picture above right. I know that my camera's metering system will attempt to expose the dress as grey, so I use the rear dial on the camera to dial in exposure compensation +1. (How do I know it is +1? Experience. But if it was a little different either way, it wouldn't matter much.) I know there is some movement in the scene, but not a lot, so I set shutter speed to 1/250. When I press the shutter button the camera's exposure meter measures the incoming light as EV 7, and adds the +1 compensation to arrive at EV 8. Given the shutter speed of 1/250, the camera chooses f/2.8 and ISO 800 to achieve an EV 8 exposure, and takes the image with those settings.
Metering mode: The camera engineers couldn't get the automatic exposure metering right for every picture, so they compensated by giving you several choices of automatic metering systems. (That way, if the exposure is messed up, the engineers can always say "you should have used the other mode!") The metering modes are:
| 
|
I usually stick with evaluative metering, but I have experimented with the other modes.

For each individual shot, I have the option of changing the shutter speed with my right index finger (depending on how much the dancers are moving), and I have the option of setting exposure compensation with my right thumb (if the scene has a lot of black or white that will throw off the metering system). I can also use my thumb on the joystick to change the focus point.
There is one more dial that I sometimes use: my camera has a shooting mode dial that contains three "custom" modes. I sometimes set up C1 to be my regular settings as described above, and C2 to be my "blur" setting, changing the shutter speed to 1/5 second and ISO 100. Then I can swicth into this mode with one switch of the mode dial, rather than separately switching shutter speed and ISO. But with the newest generation of cameras, I trust the auto-ISO system, and no longer need the custom modes.
So much for dials and buttons; now let's concentrate on what the camera tells you. The great advantage of a digital camera over film is that you can see each image on the camera's LCD screen. You can quickly tell if an image is all wrong, however you won't be able to accurately judge precise focus or exposure on the small screen. Two things are more important than the image itself:
First, set up your screen to show blinking highlights. The idea is that if there is a portion of the image that is so bright that your sensor can't record details, that portion will blink on and off. Look at the display, and if the portion is something that doesn't matter--like a spotlight off stage--no problem. Below we see blinking highlights on the dancer's shoulder (due to a hot spotlight there). This image was shot at +1/3 exposure compensation; it probably should have been about -1/3 to preserve these highlights.
|
| Blinking highlights and LCD display |
|---|
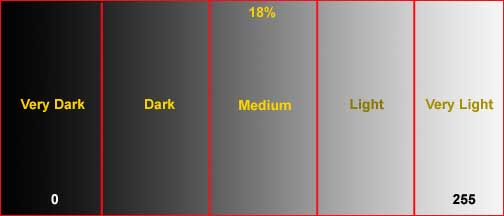
The second thing is your most important guide to judging your image: the histogram. The histogram shows the relative number of pixels at different light intensities from very dark (on the left) to very light (on the right). If the histogram has a bump (or bumps) in the middle, you're good. If there is a bump crunched up against the left edge that is a potential problem. It means that some details are lost in shadow. That might be fine (you want the unlit edges of the stage to be black) or it may mean that you need to add positive exposure compensation (to get detail back). At the other end, if a bump is crunching against the right edge, you may need negative exposure compensation to bring the details back from the white highlights.
|
| Histogram: levels of light |
|---|
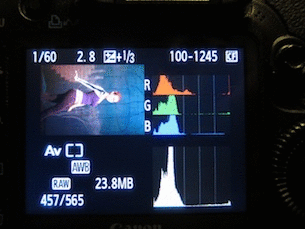
The histogram helps you with tricky situations like the one below. She has a white outfit, so you have to worry about blowing the highlights (suggesting negative exposure compensation) but also about the automatic metering turning the white to gray (suggesting positive compensation). He has a black outfit, but it is much smaller in the frame, so the main concern is retaining detail (suggesting positive compensation). I shot at -1/3 compensation; was that acceptable? The histogram shows separate channels for red, green, and blue, and one for overall luminance. Together they show that we've done a good job of protecting the highlights (nothing bumps up against the right edge) but that there is a slight problem with the darkest blacks losing detail (they are bunched up along the left, but only a sliver). Not a big problem, but probably this shot would have been better at about 0 or +1/3 exposure compensation.
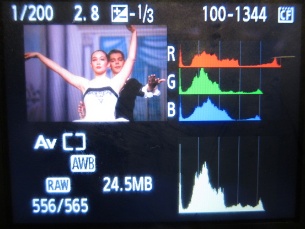
|
| Histogram display on LCD |
|---|
Mechanics of the eye: Beyond dials and displays, remember this: Don't get fixated on the center of the viewfinder. It is all too easy when there is a lot of action to get tunnel vision. If you see something you like in the center of the frame, there is a temptation to stick with it, firing off dozens of frames. Resist this temptation; don't get fixated. Make it a habit to force yourself, after every three frames or so, to broaden your tunnel vision. First look to the edges of the frame: is there something distracting there? Something that should be included or removed from view? Have you framed the image well? Then look to the camera display at the bottom of the frame. Are all the settings good? If your shutter speed is showing 1/60 and the dance movements are rapid, you're in trouble--you should be at 1/250 or 1/500. If your ISO is 6400, maybe you want to consider a slower shutter speed to get ISO down to 3200. Next, briefly glance down from the viewfinder to the LCD after you take your shot. Without moving your eye away from the viewfinder, you should be able to check if your histogram looks ok. If not; make adjustments. And finally, open your other eye. I shoot with my right eye on the viewfinder, but I keep my left eye open to look around the stage and check if there is some other action I am missing.
When there is a pause in the action, take time to look at the playback display, particularly the histogram. This process of looking at the display has acquired the pejorative name of chimping (after photographers who exclaim "ooh! ooh! ahh! ahh!" at their own shots) but it is an important part of accelerating the learning, correction, and improvement process.
On the next page we will move away from the mechanics and cover aesthetics.